Rubrics and Grading forms – the benefits they bring to staff and students

A rubric
Reading Time: 2 minutes

A rubric
By Cleonard1973 (Own work) [CC BY-SA 4.0], via Wikimedia Commons
As part of the Learning X – Live sessions we would like to invite you to our first session with guest presenters.

We welcome Jenny Woof  and Susie Schofield, who have both used rubrics for marking students work.
The outline for the session will be:

  • An overview of the benefits that using a rubric / grading form can bring to the marking process (Susie)
  • Case study of the way they have been used in Biological and Biomedical Sciences. (Jenny)
  • Group activity – looking at existing rubrics – whether on paper or electronic, and to start to develop new rubrics / grading forms.
  • Technical – short overview of the process of getting from a paper rubric to a Turnitin one. (Emma)

Time / Date: Tuesday November 28th, 2:00 till 4:00 in the Strawberry Bank Ideas Lab (mid floor of the library)

All staff welcome, but please register your intention to come via Eventbrite

Don’t forget, we also have a “How to” session on Wednesday 22nd, looking specifically at using rubrics and quickmarks in Turnitin. (Bookable)

a group of people, some seated, some standing, some with laptops, some out. Lots of speech bubbles
Source: Shared with CC0 licence on Pixabay

Introducing: Learning Footprints

Ancient footprints of Acahualinca
Reading Time: < 1 minutes

2 October: Learning Footprints – this series will explore concepts such as digital residents and visitors together with personal learning environments and networks and also discuss privacy and safety in digital learning habitats.

Day 1: Where do you learn?

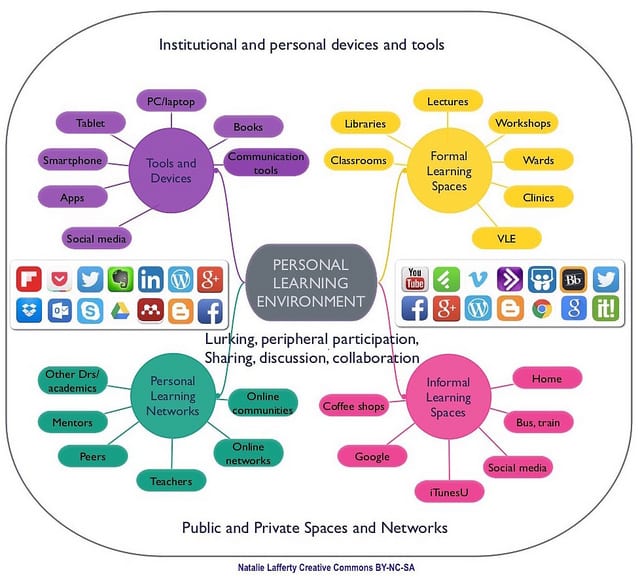
A diagram of a personal learning environment
Reading Time: 5 minutes

This week’s Learning X is exploring learning in a digital world and thinking about our learning footprints.  There’s often lots of talk about students needing to be aware of their digital footprint as they live their lives online through social media channels.  Over the course of this week we’re going to switch the focus to how we as academics learn and the places we learn in.  We’ll  look at how we use technology more generally and go on to consider areas such as privacy, ownership and who’s in control of what we see online.  Developing our understanding of these issues can help shape how we can develop as teachers in the digital space in safe and positive ways and consider how we might then go on to use technology with our students.

A diagram of a personal learning environment
An example of a personal learning environment

As we begin to explore our learning footprints let’s start by thinking about how we learn. Everyone learns in different ways and about a vast array of different things.  We learn facts and skills and about our professional identities.  The process of learning is complex and how we approach it varies according to what we’re trying to learn or master together with the context of the learning.  Whilst many of us maybe have been, or are, involved in elements of formal learning through higher programmes of study and continuing professional development activities, much of our lifelong and life wide learning is informal and self-directed.  Different forms of content play a role in supporting our learning as do people, so much of learning is social and situated in the workplace in our communities of practice.  The digital world is also playing a growing role in supporting our learning and changing the look and feel of our learning environments and leading to the concept of the personal learning environment (PLE).  With access to information online 24/7 we can learn anytime, anyplace, anywhere and self-organise our learning and create our own PLE.  We can think about our PLE in terms of:

  • The spaces that we learn in, both the physical and the virtual world. For example in the office, on the sofa at home in the evenings, on the commute into university, at academic seminars, online courses or online forums.
  • The tools and resources that we use. These might be open and free to use or are paid for or closed and restricted access. There’s Google and the Library search and other databases to access resources to support our learning,  there are the tools, apps and websites that we might use.
  • Where we record and reflect on our learning.  Perhaps using pen and paper, by creating sketch notes or using digital tools and note taking apps to organise and file resources that support our learning.
  • How we share what we’ve learned.  In team meetings, conversations with colleagues or maybe share our learning through social networks and online forums.

The look and feel and what makes up a PLE will look different for each of us.

Think about your own personal learning environment (PLE).  The physical and virtual spaces that you learn in, the tools and resources that you use, how you record and reflect on your own learning and then share it more widely.

Begin to map out or sketch your own personal learning cycle or learning environment, detailing the places, spaces, resources and tools that you use to support your learning.  You can sketch this out any way you like. As you think about this don’t restrict yourself to learning that applies to your professional work life but also to your hobbies and interests, for example learning how to fix something, how to use the more advanced settings on a digital camera, how to ice a cake etc.  Consider whether there are differences between where formal and informal learning takes place. Once you’ve finished mapping your personal learning environment you could compare with some that other educators have created over on this PLE wiki.

Are there similarities  between your PLE and those on the wiki?  This was created several years ago and you’ll see that some of the images are missing which highlights that transient nature of content on the web.  Individuals close down sites and the content disappears.

It would be also be great to compare and contrast across the University so if you take a photograph with your phone you can upload it into this folder on the University’s One Drive only, open to those within the University.  Alternatively share it via Twitter and include the hashtag #UoDLearnX.

You might want to try this exercise with students.  It will give you an insight into how your students are learning and help them share useful resources and tips to support their learning.

With knowledge growing at exponential rates it can be a challenge to keep up to date and not feel over whelmed by constant streams of information flowing from multiple channels.  The ability to filter information is an essential skill and our professional and learning networks can play a key role in helping to sign post us to useful content and resources.

Building on the concept of the personal learning environment, Canadian Harold Jarche has coined the term – Personal Knowledge Mastery  (PKM) built on the principles of Seek > Sense > Share.  Jarche suggests that we need to take responsibility for our ongoing personal development and that we can’t always do this alone.  He encourages individuals to

  • Continuously seek out people and knowledge to improve the breadth and diversity of your knowledge networks.
  • Experiment on a regular basis to try out new practices in order to learn by doing.
  • Make sense of your life and work by making your thoughts explicit (sense-making). Review these from time to time.
  • Seek out communities of peers that will enable you to improve your professional practices.
  • Share your learning with discretion at work, in your communities of practice, and with your social networks.

Jarche highlights the process or routine of undertaking PKM will vary from individual to individual as we all adopt our own approach.

Some examples of approaches to PKM are outlined on this blog post ‘What is your PKM routine?‘ and there are links to other examples.  Harold’s blog provides a wealth of blog posts written over more than a decade on connecting work and learning and sharing.

Scot Leslie, an educational technologist in British Colombia, posted some observations on PLE diagrams over on his blog back in 2012.  It’s worthwhile reading this and seeing which category your own PLE diagram falls into.  What’s striking in reading Scott’s blog post is that a number of the images that Scott embedded into the blog post are missing, there are empty boxes where these diagrams would have appeared when he first published his post.  This highlights how some of the spaces that we use to support our learning can so quickly and easily disappear.  Individuals who were once enthusiastic bloggers stop and take down their sites.

The same is true of organisation websites and information portals.  One only has to think of the old HEA subject centres and the websites that supported their work which have all now pretty much disappeared.  This all points to the digital aspects of our PLEs being transient and in some cases having a short-shelf life as sites and digital tools come and go.  Even Google has retired tools which 5 years ago might have been a common feature on some PLE diagrams. Scot Leslie – Some Observations on PLE Diagrams

Day 2: Online identities, digital residents and visitors

Image of woman's face with no facial features and to the right a series of concentric circles with different social media icons, digital icons and communication icons
Reading Time: 5 minutes

Image of woman's face with no facial features and to the right a series of concentric circles with different social media icons, digital icons and communication icons

Having looked at our personal learning environments and started to think about the digital spaces and tools that support our learning we’re going to move on and consider our interaction with digital spaces and where we might leave traces of our online identities.  As many of us live out elements of both our professional and personal lives in digital spaces it’s worth taking time to consider how we manage the various personas we may present in the digital realm. If we use digital tools and spaces in our teaching we also need to take care to make sure our students have an understanding of the implications of using them and encourage them to think about how they will manage their digital identities and gain awareness of how they can manage their learning footprints.

Dave White and Alison Le Cornu have proposed a metaphor for mapping how we engage with the web and different technologies in both our personal lives and professional lives as a continuum of visitors and residents. Previous attempts to categorise how we engage with the digital world have suggested that the extent of our use may be linked to our age  leading to the notion of digital natives and digital immigrants as outlined by Marc Prensky.  White and Le Cornu challenge this assumption and the premise behind their metaphor is that we visit some online spaces and don’t leave a footprint or trail of our presence whilst in other spaces we are resident and a record of our engagement and our identity is evident.  Many of us are visitors on Google as we undertake a search, we might also be visitors on a site like YouTube as we look for videos that we might use in our teaching or to support our learning but if we’re posting our own videos or commenting on videos on YouTube we can be seen as residents in this online space. Dave White gives a helpful overview of visitors and residents in this video.

Many in higher education circles have been guilty of perpetuating the myth that our students are all digital natives and therefore more digitally savvy than us as their teachers.  Evidence from work done by Jisc and others over the past 10 years has highlighted that whilst our students may be adept at using social media they do not necessarily have well developed understanding and skills on how to use technology to support their learning.  Applying the digital visitors and residents metaphor can help us gain a better understanding of where our students sit in the digital realm and help them begin to explore and better appreciate the identities they are leaving traces of online.
References and further reading

Have a go at mapping out your own digital visitors and residents map, either draw your own out on a piece of paper or download this Digital resident – visitor mapping template and complete.

Once you’ve completed the mapping exercise reflect on the following points:

  • Is there anything that surprises you having completed this mapping activity?
  • How likely is your map to be similar to that of your colleagues?
  • Do you think it would differ much from one created by one of your undergraduate, postgraduate or research students?
  • How many digital identities or personas relating to different areas of your life are resident on the web?
  • Given that individuals may have different motivtaions and philosophies which shape their interactions with and use of technologies, what impact do you think this might have on using different technologies in teaching and learning.  Think in particular about the use of social media tools such as Facebook, Instagram or Twitter in  education.  Do you think they have a role?  Have a read of Catherine Cronin’s post on Enacting Digital Identity.
  • Do you think students consider how the data and footprints they leave online are used by organisations such as Facebook, Twitter, Google, Apple?
  • Is there anything you would change about your online activity or how you manage your online identities having completed this mapping exercise?

Feel free to share your reflections and thoughts in the comments sections below.

Asking your students to create their own visitor and resident maps is a useful way to understand how they are engaging with the world wide web and in particular how they use it to support their learning.  Also as we look to incorporate learning and teaching on digital skills and information literacy into our curricula, the visitor and residents exercise can help prepare the ground to go on and explore issues around online privacy and how online channels, and in particular social media channels, use our data and how in turn algorithms control much of what we see in our social media channels.  It’s an activity that can begin to raise students awareness of what they are doing online and make them consider their own digital identities in a more positive context than the more usual approaches that tend to focus on the negative aspects of online behaviour.

If you’re interested in doing this activity with your students, Dave White had produced a facilitators guide to support a group activity on visitors and residents that has been licensed for open use and reuse. You can access the guide and the accompanying resources and notes on his website Digital – Learning – Culture.

A recent paper from Maralyn Druce and Stella Howden outlines how this mode and exercise can be used as a lens to gain perspectives of students online learning behaviour. They highlight how understanding the visitor and resident spectrum of our students can provide insights into how they use various digital tools and could also help inform course design.

The visitor and resident model could also help you see where students might need some guidance on how to use some of the tools that we take for granted in our disciplines and help us to develop strategies to nurture their self efficacy when it comes to online learning.

References

Druce, M. and Howden, S., 2017. New perspectives on health professions students’e-learning: Looking through the lens of the “visitor and resident” model. Medical Teacher, pp.1-6.

Today’s link of the day is to a report titled ‘What makes a successful online learner?’ published by Jisc and which builds on their work looking at students’ digital experience in relation to learning.  Whilst it identifies that some of the attributes of successful online learners are more applicable to postgraduate and CPD courses delivered online it’s useful to read this report in the context of all of our students and reflect on how we can help them to develop as successful lifelong learners in a digital world.

This Slideshare presentation from the Jisc team working on this project outlines how this project was approached and summarises key recommendations for lecturers involved in delivering and designing online learning.

Day 3: Privacy

Reading Time: 3 minutes

Private - hanging from a chain.
Shared with CCO licence  on Pixabay  

Over the next two days we’ll look at two of the fundamental issues of starting to generate a learning (or any form of digital) footprint – what others can see about you.

Today, we’ll be looking at those aspects you may prefer to keep to yourself, tomorrow, it’ll be what you actively want to promote.

Over the last few days, you have started to look at the tools that you use online, and we’re aware that many of them leave a trail of content. You’ll probably also have read assorted news items about content that others would rather people haven’t found online.

The term Digital footprint is often used, and, though we are focusing on learning footprints, for most people, the personal and work/learning are intricately linked, unless you are assiduous in your use of a pseudonym in one or the other case. There are two main aspects to a digital footprint – the passive (data that exists about us) and the active (data we create about ourselves).

As we can do very little about the former, it’s the latter we’ll be looking at primarily.

You have probably already done this many times, but just in case you haven’t, try searching for yourself. One thing that you may find useful, is to try to see what others see, as your own browsing history can influence current search results.

How much did you have to refine your search to find stuff that’s about you, rather than someone with the same name? About you as a learner, rather than other aspects of your life? Could you share the search (or a screenshot thereof?) If you ask someone else to search for you, do they find the same as you?

Do you use a pseudonym in some or all aspects of your online life, if you do, does searching both your name and the pseudonym find anything that would link both (do you want them linked?).

You may well have heard of the “right to be forgotten” – this allows you to request the removal of content from search engines, though not from the site that’s hosting the content (if it’s a site that you can’t edit).

Some people will go to the extent of trying to hide all online activity, though many would argue there are potentially more issues in being totally hidden (e.g. why would someone want to hide everything?)

Another approach that some use is to use anonymity,and, perhaps predictably a number of tools have grown up to support anonymity- but, there has been a lot of negative press about the potential issues of cyberbullying via anonymous channels. We do, however, mark anonymously – so should we (and students) be able to learn anonymously?

As we’ve already said, today, we’re thinking about content that you may not want others to see, tomorrow, we’ll look at how to engage with others as part of your learning. As food for thought, how happy are you to share online aspects of learning through failure (ACM article, may require login if not on campus)

While there is a lot of research into privacy of online content generally, there are rather fewer articles on privacy of learners online. Here is  selection of those you may find interesting.

  • David John Lemay, Tenzin Doleck, Paul Bazelais, “Passion and concern for privacy” as factors affecting snapchat use: A situated perspective on technology acceptance, In Computers in Human Behavior, Volume 75, 2017, Pages 264-271, ISSN 0747-5632, https://doi.org/10.1016/j.chb.2017.05.022.
  • Karen Kear, Frances Chetwynd & Helen Jefferis (2014) Social presence in online learning communities: the role of personal profiles, Research in Learning Technology, 22:1,19710, DOI: 10.3402/rlt.v22.19710
    (looks at the different ways students with / without profile information behave in a learning community)
  • John Suler. “The online disinhibition effect” CyberPsychology & Behavior. July 2004, 7(3): 321-326. https://doi.org/10.1089/1094931041291295 (though dated, it’s a good overview, one that has been used many times since)

Future learners.


Siân Bayne, from Edinburgh University, gave a presentation at alt-c about YikYak – a tool that encouraged anonymity, and how the students there used it, in a primarily positive way.

Day 4: Open practice

an open conker
Reading Time: 3 minutes

an open conker
Shared as CC0 on Pixabay

Yesterday we looked at privacy, and the content that you may wish to keep private. While academic staff are used to sharing the outputs of their learning (research papers etc), it can also be very valuable to share the process of getting to that point, and indeed, learning about things other than research.

Over the past few days, you’ve been thinking about the online tools you’re currently using while learning, and how you have been using them. You may have included in your PLE learning events that others have put together (e.g. a MOOC), and those that are entirely self driven (such as your blog)

We’ve also looked at privacy, and how you decide what you want to be private. In some cases, this division can be blurred.  For example, if you participate in a MOOC, is it “public” – because anyone could enroll on the MOOC and see comments you post on your learning, or is it “private” – because others have to enroll on the MOOC to see the comments? If you use Twitter, and set your account to be protected (rather than the default public, which allows anyone, Twitter user or not, to see your tweets) – are you sure you know who everyone is who you’ve granted access to?

There is a great deal of value in allowing others to see the learning journey you’re taking, both to help your readers learn, and, often to support your own learning. One of the earliest blogs I came across, when looking at using blogs to support learning, was one (sadly no longer on line) created by a PhD student. She was looking at life in the trenches, the engagement she got with others – often children of those who’d served in the 1st World War, as she documented her research, gave her a much more in depth view of life in the trenches, than had she not made the research easily available to the public.

As an open (or public) learner, it can be very daunting, to know that others have the potential to see what you are doing, and that material may be found at any time. While finding material for this section, I came across a blog post by Inger-Marie C. She’s only written blog posts (on that blog), over 3 months, and I don’t know her full name. I do know, however, that she’s participated in an OU course about Open Learning, is clearly outlining what she’s learned – as well as providing me, the reader, with links to relevant other research – much of which, given the nature of the blog, is relevant to this theme.


Thinking about the tools that you have included in the PLE, which, at present, would you see as being valuable to others for their learning?

Could you see ways of adding to those tools you are using to further enhance your learning footprint? How public do you want to be?


Cover of the book - the digital scholar
The Digital Scholar

Next week, we will be looking at an OU course “The Digital Scholar“. It’s run by Martin Weller, and based on his book of the same name. (shared as CC on the Bloomsbury Press) OU Open Learn Courses, unlike FutureLearn MOOCs, are open ended, with no start / end date.

Some of the earlier MOOCs looked very much at connected online learning, in particular those run by Stephen Downes and George Siemens, and, while there is debate about the role they played, they were key to raising awareness of the power of shared, online learning experiences.

LSE have a range of blogs, and, while they mainly focus on completed research, rather than the process of learning, they provide a powerful way of engaging with others.


We’ll go for a nice easy watch today for the link of the day!

Day 5: Where do you teach?

Reading Time: 3 minutes

Over the course of the week, we have looked at where and how we learn; what aspects of our learning is public and networked. Today, we’ll focus on how we teach. Often, we don’t have as much choice of that as we may wish. If you are a student, you might want to think about what is restricting the way you are taught – as well as your own preferences, remember that in many cases, we have external bodies that may govern, as well as *what* you need to cover, some aspects of *how* it should be taught or assessed.

In much the same way as we got you to think on Day 1 about how you learn, we’d like you to think of the same aspects of your teaching.

Looking at the questions posed at the start of the week, we’ll re-ask them in terms of teaching.

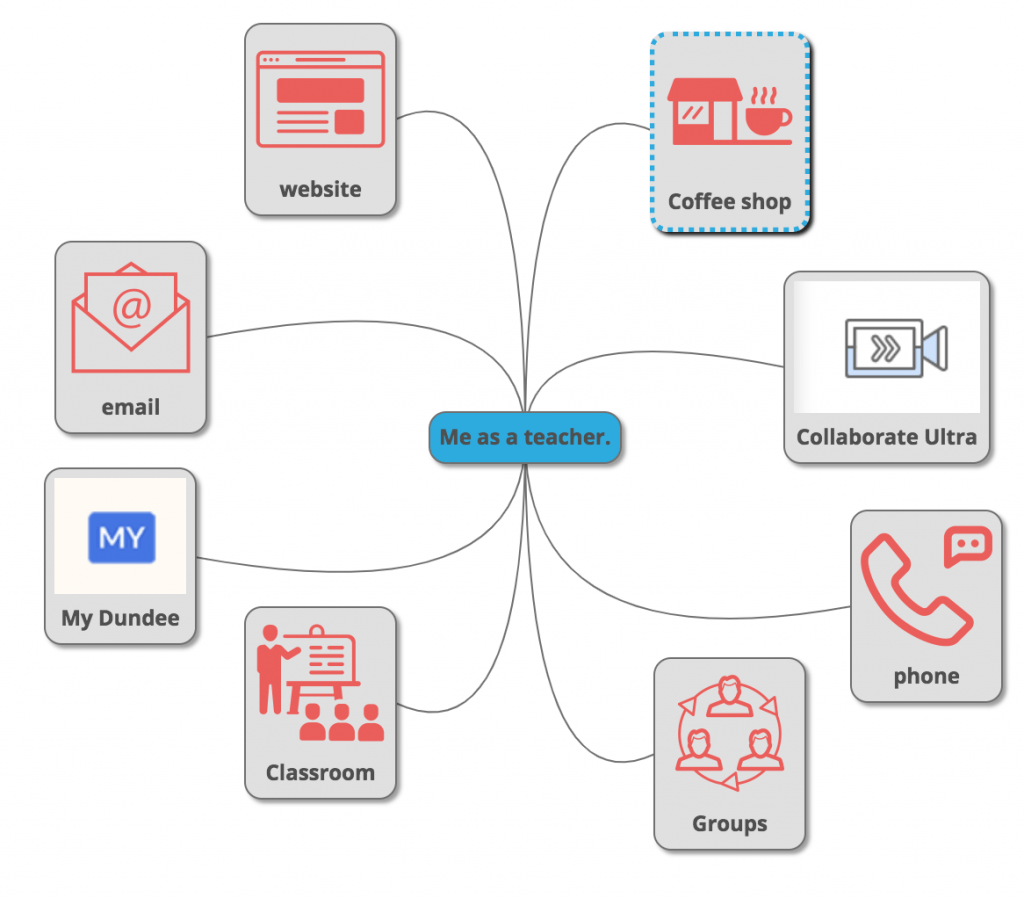
  • The spaces that we teach in, both the physical and the virtual world. For example in the lecture theatre, your office, a coffee shop, on the sofa at home in the evenings, on the commute into university, at academic seminars, etc.
  • The tools and resources that we use. We may not have choices over some of these. Most will be using My Dundee or Moodle, along side other tools that you may decide to include.
  • Where we record and reflect on our teaching.  Perhaps using pen and paper, by creating sketch notes or using digital tools and note taking apps to organise and file resources that support our teaching.
  • How we share what we’ve learned as a result of the teaching.  In team meetings, conversations with colleagues or maybe share our learning through social networks and online forums.

Have a go at drawing out how you feel you are currently teaching; the locations, the tools.

This was a quick image that I created, using a couple of different tools  – Mindup to create the mind map, and The NounProject for most of the icons. In my current role as an educational technologist, I’ve moved from the more formal teaching a couple of hundred students in in lecture theatres – to classroom sessions for staff, and more impromptu questions and conversations, over the phone, in peoples offices, in the library cafe …

When you have created this – what overlaps do you see between this and the learning one you created at the start of the week? Are you happy with the differences? [For example, you may be entirely happy to have video purely as a learning tool, and not feel the need to teach using it!]

Share your thoughts in the discussion areas – and, as with Day 1, feel free to share your “Personal Teaching Environment” diagrams with others.

As a side note, while I’m not claiming to have coined the term Personal Teaching Environment – it’s hard to find other cases where it’s used.

There are a great many resources about teaching, and many of them cover incorporating digital approaches into teaching, so rather than providing a list here, we’ll just point you to the NMC’s Horizon reports.

They have been producing these reports for a number of years, looking at where they see Education and technology being in “one year or less”, “two or three years” and “four to five years”. They have reports for K-12, Higher Education, Libraries and Museums, and, as they have reports going back to 2004, it can be interesting to see how accurate (or otherwise) their predictions have been.

We’d also be interested in other reports and research you have found, or perhaps MOOCs you have found useful to learn more about the futures of networked learning and teaching.

In the next week or so, we’ll be looking at the Digital Scholar, an open learning course run by Martin Weller. To get an idea of what’s to come, have  a look at the following video:

Introducing: Module Makeover

Pen, on an open, blank notebook
Reading Time: < 1 minutes
Pen, on an open, blank notebook
Photo by Mike Tinnion on Unsplash

The new season kicks off on Monday 7 August with a Module makeover series designed to help you get your modules ready for the start of the new session. Module makeover will encourage you to think about developing a module checklist to ensure you have all the key information ready to view for your students.  It will also point you to online learning on the web to help inspire you and highlight some tools and approaches that you might not be aware of.

Day 1: Module refresh checklist

Checklist on a blackboard
Reading Time: 6 minutes

The new academic session is almost upon us, modules have been rolled over and Blackboard, aka My Dundee, has gone through an upgrade cycle. One thing you’ll notice is that following this summer’s upgrade we’ve also given My Dundee a bit of a makeover giving it a fresher, cleaner theme. We’ll also be continuing, behind the scenes, to make further improvements to various aspects of the My Dundee online experience over the coming months.

Following up on the theme of improving the online learning experience our 2017/18 Learning X season kicks off this week with ‘Module Makeover’.  Over the next 5 days we hope to provide you with some helpful tips as you get your modules ready for the new semester. We’ll also put the spotlight on some of the tools in Blackboard and perhaps inspire you to try something new.  On Wednesday 9th August you can also drop in to to the Eduzone between 10.00 and 12.00 hrs for our module makeover workshop where we’ll look more at getting your module ready for the new semester.

Checklist on a blackboard

To get us started we’re going to think about a VLE module checklist.  Many UK Universities have policies in place outlining the minimum requirements in terms of the information a student can expect to find in the virtual learning environment (VLE).  These minimum requirements don’t tend to be lengthy lists but rather a short set of criteria relating to module administration, content and assessment.  Let’s take a look at the sort of things that might be considered as minimum or standard feature of a module in My Dundee.


It maybe that your School or Programme have one of these sorts of checklists already in place. However, even if that’s the case it’s useful to review your checklist from time to time and see if there’s anything that can be added whilst casting a reflective eye over how you present your module online. Presenting key module information in an accessible way can help save time for students and staff. Here are a few things to think about as you refresh your module for the start of the new semester.

Welcome Message

Students will be checking the VLE before they come back to the campus so it’s good to have a welcome message to the new year and your module.  The same applies to distance learning students who won’t see you in the flesh but will still get a sense of being welcomed to the University.  You could write your welcoming message and post with a photo of yourself, record a video using your webcam or an audio podcast.  These are all great ways to help students make that initial connection with you, particularly if they are new students.

Introduce the teaching team

Students also find it helpful to be introduced to the teaching team for a module. So here a photograph of the module lead and other lecturers involved in the course together with information about how you can be contacted is always helpful.  It can also be useful to mention something about expectations in terms of turnaround in responding to emails etc.

It’s also worthwhile introducing the admin team who support your module as students are likely to have interaction and communications from them and it’s always good to be able to put names to faces.

Module information

If you already have a module checklist, information on the module is likely top of the list.

Module Handbook – This is going to be the cornerstone of the module and you might present this in different ways.  Some modules create a Blackboard ‘Learning module’, but most typically the module handbook will be uploaded to My Dundee as a Word or PDF document.  Some Schools are sharing core module information and documents through Box and sharing the folder link in My Dundee.  The advantage here is that you can update modules without the need to keep replacing documents in the VLE.  You can also use One Drive which forms part of Office 365 to do a similar thing.  You can simply create a Group in Office and share files with your students and have a link from My Dundee.

Module at a Glance – In the module information section have a think about the common things students always miss.  Would it might be worthwhile producing something like a ‘Module at a Glance’ in the form of one side of A4 or as an infographic summarising the important things students need to remember or know. You could even involve students in creating one of these.  On a similar theme you could involve students in making similar summaries of infographics around key learning opportunities in the module and how to get the most out of it.

Response to Feedback – Finally in this section think about whether you want to communicate any changes you’ve made to the module based on student feedback from the last run.  In effect a ‘you said, we did’ piece that highlights changes you’ve made to enhance the module based on student feedback.

Assessment

Students like to have clear information on how they are going to be assessed so this is an important section.  Double check that submission dates and deadlines have been updated from last year.  If students can receive formative feedback on drafts prior to submission outline the process for this.

Content

Your content section will build up once the teaching starts but as you start to pre-populate with lecture notes and handouts double check the copyright status of content you’re reusing from other sources and that web links have been checked and still work. If you need advice on digitising content then be in touch with the Library.  Also remember to update your reading list, here again the Library can provide guidance and support and information.

This isn’t an exhaustive list but hopefully it will get you thinking. The likelihood is the there are things you’ll feel are essential that haven’t been covered here. If that’s the case please do share your thoughts in the comments.  If you’re a student reading this we’d also welcome your views on what you think is essential to include in a module in  My Dundee.
If you have a module checklist, take time to review it, are there things that you could add to help your students?

If you don’t currently have a checklist take a look at some of these examples of minimum requirements from other Universities as a starter for ten to help inform the creation your own checklist.

  • For a quick overview of what sort of things other universities have in their minimum requirements take a look at this Google Doc which, Peter Reed invited colleagues across the UK HEI sector to contribute to whilst he was working at Liverpool and doing a research audit in this area.  If you’re short on time this provide’s a helpful bird’s eye view.
  • York St John University uses Moodle rather than Blackboard and has a comprehensive set of Minimum Expectations for each module. These cover course layout and design, support for learners, communication and assessment.
  • The University of South Wales has a downloadable one page Checklist for Course Leaders.
  • The University of Leeds School of Mathematics has a discipline specific set of requirements that could serve other disciplines and  highlights the need to link to University policies that are relevant to students.
  • The University of Newcastle has a VLE threshold standard. This document is longer than the others but provides an interesting insight into their approach.

In some cases other universities have developed these minimum requirements based on feedback from their students.

Think about how you can get feedback from your students regarding the online layout of your module and the information that’s available and presented. Ask them if they might have suggestions of how the module can be enhanced. Is there key information that’s missing? Do your students get a consistent experience across the modules in your programme?

A final thing to consider in your checklist is how easily accessible the key information is to your students and fellow staff.  Here have a think about the course navigation.

One of the complaints about My Dundee is the endless number of clicks it takes to get to key information.  Sheffield University makes a suggestion that lectures should aim to have course information no more than three clicks away for students.  Again this is something you could ask students to provide feedback or you could peer review each others modules.

Share your thoughts on what you think needs to be included as standard in each module in the VLE in the comments section.  Are there things that we’ve missed?

Peter Reed who used to work at the University of Liverpool led a piece of work on minimum VLE requirements across UK Universities.  He found that drivers for these requirements came from both universities centrally as well as from the student voice. The slideshare presentation below provides a helpful summary of his work.  If you’re interested in reading more take a look at Peter’s blog post ‘Sector-wide subscription to VLE minimum standards‘ or his paper, in the journal eLearning and Digital Media, on his research with VLE mimim requirements at Liverpool – Hygiene factors: Using VLE minimum standards to avoid student dissatisfaction.

One of the suggestions in the first section of today’s session is to think about the potential of creating an infographic summarising key module information.  Infographics are an effective way to communicate information that can on the surface appear complex and there are various tools that you can use to help you create them.  Two that are worth checking out that support free accounts are

If you try them out and produce a nice graphic please share the link with us via the comments section.

Day 2: Making over your module: Inspiration?

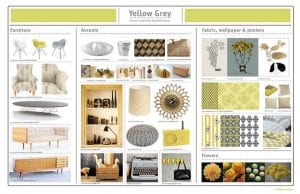
Furnishing and decoration mood board with yellow and grey theme. Includes fabric swatches, furniture
Reading Time: 6 minutes
 

Furnishing and decoration mood board with yellow and grey theme. Includes fabric swatches, furniture
“Yellow Grey | Decor8 contest” by bubbo.etsy.com shared under a Creative Commons (BY-NC) license

Building on this week’s Learning X theme of Module Makeover take a moment to think about how you approach giving your home a makeover or doing a spot of decorating.  Some of us like to keep things simple and take the easy approach, going for cream or magnolia walls in every room.  For others giving a room a makeover is serious business.  Home interior magazines and design blogs are scoured, Pinterest boards created, interior designers and retailers are followed on Instagram whilst YouTube and TV shows serve as further inspiration. Building on all this research some individuals make mood boards, get swatches of fabric, tester pots of paints.  Meticulous planning and research goes into the makeover process. All this research helps inspire and generate ideas.  Certain designs and colour schemes standout and get copied, adapted, remixed and given a personal spin to reflect individual’s personalities.  Some follow the latest design trends, others like to freshen up with more timeless styles or create new trends to fit the function of the room and the mood they want to create.

How does this process compare with how we approach our Modules in the VLE?


As each new academic session starts in many cases modules in My Dundee just get rolled over with a splash of magnolia on the walls to cover up the scuff marks.  The reality is that often that’s all there’s time to do!  Lack of support and training are also problematic and in a sense perhaps the checklists that have sprung up in many institutions are a way of ensuring that despite these issues there’s a degree of consistency in the student experience.  VLE module checklists are important, but with so much potential to try something new and innovate it’s important that they don’t also limit us and stop us from being bold and ambitious and from experimenting with new online learning design approaches.

So what’s possible? Having thought about module checklists yesterday let’s move on from simply thinking about the VLE as a filing system housing core module information.  To do this move the focus away from the VLE and a specific technology and look more closely at how you want to teach and what you want your students to learn.  Think about whether the digital space and digital tools can help support and enhance your teaching and the student learning experience. Could the application of technology in your teaching help overcome any challenges that you currently face or help address issues raised by students in course feedback?

Just as looking at design features in magazines and blogs can inspire your home decorating we’re very conscious that the same holds true when designing your Module in the VLE.  One of the limitations we have currently is that we can’t share modules in My Dundee so it’s difficult to explore what others are doing and to see examples of creative and innovative use of the VLE and other tools to support learning.  We plan to change this over the coming year but in the meantime in the next section we’ll point you to some examples from elsewhere to see if they might help provide some inspiration and give you some ideas that you can take and remix in your own module.

Are there things you’d like to add to your online module or that you’d like to try or aspects that you’d like to improve?  Keep a list of these things or start to make a list once teaching starts again.

Perhaps you need some inspiration.  The University of Aberystwyth runs an annual Exemplary Course Award, to share good practice across the University.  Aberystwyth has been running this for several years and found that the exemplary practice is being spread to other courses as a result.  Take a look at the awards page and some of the video presentations from the award winners to see if there’s anything that you can take and apply to your own module.

Another place to seek inspiration, or confirm how not to do things, is to take a look at some of the MOOCs, Massive Open Online Courses, that are free to enrol on.  MOOCs are available across the whole range of higher education disciplines so you should be able to find something that relates to your own teaching area. It’s also worth looking at MOOCs that are outside our discipline as you might find ideas and approaches that aren’t common in your own domain but with a bit of tweaking could work well and make a useful addition to your module.  To explore some MOOCs check out the following:

For a MOOC with a difference check out CLMOOC – an open, collaborative, knowledge-building, learning and sharing experience,with a slightly more creative approach to designing and supporting online learning.

As you take a look at these various examples it’s also worth reflecting on how you learn and your own wider experience of using online learning and technology.  What have been the good experiences, what made them good, is there anything in these experiences that you can take and apply to your module?  Are there also things you’ve not liked, why haven’t you liked them?  As you think about your own personal learning consider the different aspects of your learning, knowledge, skills and professionalism.  Are there different learning theories and philosophies that can come into play and help to shape the design of the learning in these domains? Can technology also play a role to facilitate some of that  learning online to complement what you do in face to face teaching and help your students develop as more self-directed learners?

Share your thoughts with us in the comments.

One of the criticisms levelled at the use of technology in education is that its adoption and application haven’t always been informed by scholarly evidence.  There’s also a view that the technology is acting as the agent of change rather than the teacher.  With this in mind one of the objectives of Learning X is to signpost some of the educational literature. To help with this we’ve created a Learning X group on Mendeley to share some of the research that we refer to and other publications that we think might be of interest and help to inform practice.  You can join the group and add to the collection that’s that there.

A couple of papers to check out are:

Follow and join Learning X on Mendeley to explore and contribute to the collection.

Today’s link is to Jane Hart’s top 200 tools for learning.  For the past 10 years Jane has been collating a list of the top 100 tools used in learning based on the votes of learning professionals involved in academia and learning and training more broadly.  You can explore the current top tools and read how other learning professionals use them.  If you delve deeper into the site you can see how these tools have moved up and down the list over the years.  What’s interesting is how many of these tools are used by educators to support their own personal learning and their role as a teacher/trainer, they don’t just use the tools with their students.  You’ll notice that Jane is also polling for the 2017 top tools so you can also submit your own personal top 10 learning tools.  The slideshare below walks you through the 2016 top 200 tools for learning and you can also check out the best of breed across different categories of tools in 2016 on the website. If you’re interested in some of these tools and need any support to look at them further do be in touch.